There is a lot of different and conflicting information on the Internet on dust collection. The most comprehensive is probably from Bill Pentz. Nothing I have to say in this page is as authoritative as what he has written!
That said, not all of us can afford the cost or space for a nice ClearVue cyclone system! My use case described here is for a double garage, and I’m just a very part time woodworker. Some might say I collect tools more than I create! That said, I have had times where after milling a bunch of wood, I had sinus headaches from the dust and knew I needed a better solution than what I had.
I started out with the basic Harbor Freight single stage unit. It’s one of the cheapest solutions but yet is one of the few Harbor Freight tools that come with good recommendations. Yes, it’s probably not the full 2HP they advertise. It kind of gets the job done out of the box, as far as sweeping up the big chips. As with shop vac solutions, most people think that’s all that is needed. I used the basic setup for a few years as I accumulated the rest of the parts to build this.
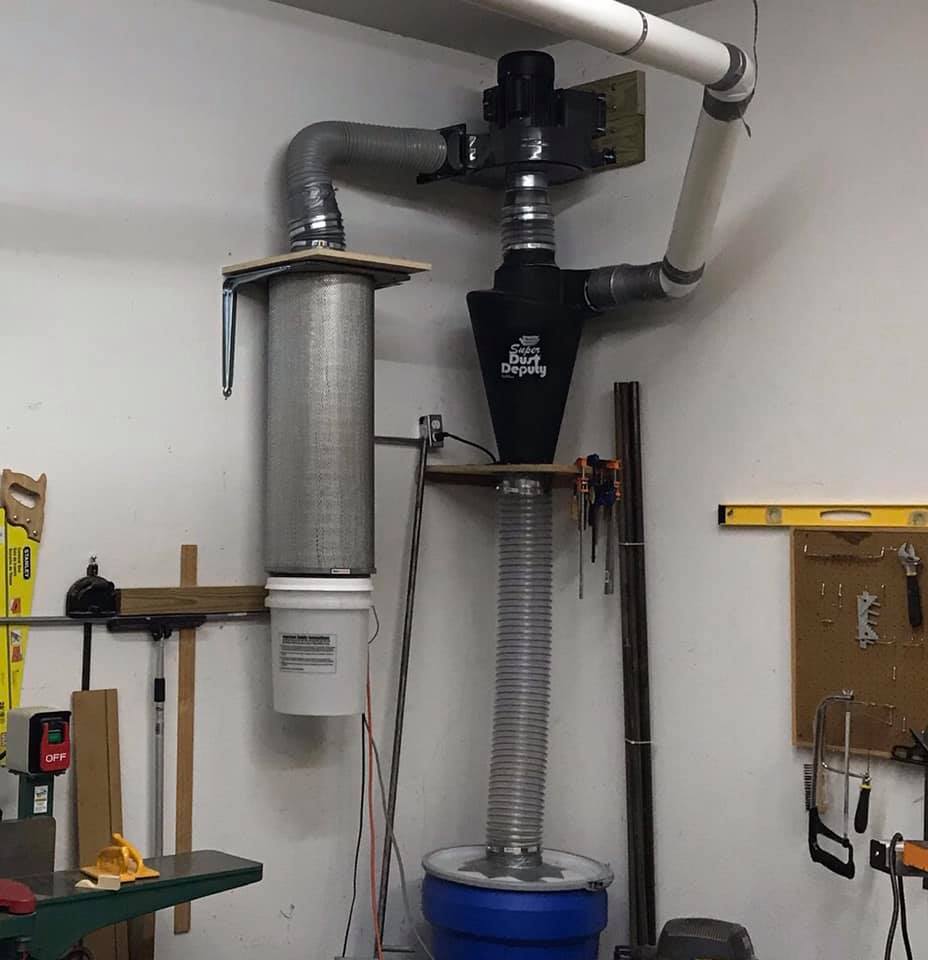
The real problem is nearly invisible – very small dust particles that you breathe. It takes a lot of air flow and fine filters to truly keep that out of the air. So I set about adding some upgrades to the basic HF collector, and ended up with this wall mounted solution that minimizes its floor footprint and has a better chance at actually improving the air quality of my garage.
A few notes on parts that I found important in creating this:
Filter: The bag that comes with most single stage dust collectors is a joke. Some call it a dust pump. The bag clogs quickly, restricting air flow. I got the idea for my setup mostly from Wynn Environmental where you can get several different types of filters, to connect to the existing ring in a single stage collector, or as I have done, just a simple flange that you can attach to a board or plenum box. I opted for the flange since I intended to use a cyclone and discard the “donut” that came with the dust collector. These filters have a very large surface area and allow for a lot more airflow. Oh, and it’s a MERV 15 filter… This is hospital grade filtering!
Cyclone: The cyclone is the Super Dust Deputy (5” Cyclone) from Oneida. This one is appropriate for 1-3HP systems. Keep in mind that cyclones add resistance to the air flow, and the HF might not have enough oomph without the increased airflow provided by the filter above. That said, I think it’s essential because it both keeps most of the dust away from the filter, and also keeps trash from hitting the impeller blades which could end up damaging them when you inevitably suck up a screw. It’s also a lot easier to empty the barrel below, instead of a dusty plastic bag.
I tried to set up some tests before I got around to doing the final setup, and I was initially concerned that it wasn’t doing a great job, but that leads me to…
Air leaks are BAD. The tiniest bit of air leak below the cyclone renders it inoperative. My initial bucket did not have a sealing lid, and my handmade plywood lid was insufficient. I picked up a nicer barrel that has a nice lid and locking clamp. This sealed up the bottom half of the cyclone and the result was stunning compared to what I had before.
Gamma Seal: One more addition to the filter stack: Wynn Environmental has a page that mentioned Gamma Seal buckets, for which they make a special clamp. The bucket has a screw on lid that you can cut the center from and clamp to the bottom of the filter stack. Then you can simply twist the bucket off and onto the filter to catch any remaining dust that makes it through the system.
In practice, the only time I have managed to find dust in the bucket is when I stuck the hose into the old barrel of sawdust, sending a ridiculous volume of dust through the system. Only a pinch of dust ended up in the bucket under the filter. Nothing at all made it into the ambient air – it smelled cleaner in the garage than before.
UPDATE: After using it long enough to fill up the bucket, I blew compressed air back through the outside of the filter, and I did knock loose enough dust to notice… maybe 1/2 cup of volume.
Lastly, a few words about why I arranged the ducts the way I did. The goal is to minimize the duct length of all parts of the high speed air pathways. Every inch of duct adds friction, and corners add even more. Flexible hose is the worst, so it must be kept to a minimum.
I have seen plans where people have mounted the cyclone on top of the barrel and then extend a host from the cyclone to the fan; I think that makes for unnecessary length of the high speed flow, as well as complicating the opening of the barrel to empty the sawdust. In my design, the flexible hose is below the cyclone where there is low pressure but not high velocity air so friction isn’t a problem. In fact, friction here just slows down the sawdust which makes it fall into the barrel. The top of the cyclone is right at the edge of the fan, minimizing the distance of air flow.
Keep ductwork bends large and sweeping, no sharp corners. I’m using 4 inch sewer drain pipe which is about the right volume for 1-2HP systems. 3HP and up would need 6 inch and a larger cyclone.
As I write this, I have only been using my new setup for a few weeks, but I have been completely impressed by how well it is now working. I helped mill some cedar for a friend, and if you like the smell of cedar, well, it was almost disappointing because when we were done there was no cedar smell in the garage… it actually smelled cleaner than when we started! My lungs sure felt better for it though.
Comments
2 responses to “Dust collection my way”
What model of the filter did you get here?
I believe it was this: https://wynnenv.com/products-page/woodworking-filter-pricing/13f230nano/