Author: dmorton

  • What’s this?

    For a long time our domain has had a message “This page intentionally left blank.” We use it for email and other purposes, but hosting a website has not really been the highest of priorities. That still hasn’t stopped the spam email asking if I need help redesigning my site! “I stopped by your site and saw that you …” Well, no you didn’t get that from my site!

    Still, I had this free wordpress site set up to post a few ramblings years ago, and decided I could host that myself instead, so here we are!

  • Dust collection my way

    Dust collection my way

    There is a lot of different and conflicting information on the Internet on dust collection. The most comprehensive is probably from Bill Pentz. Nothing I have to say in this page is as authoritative as what he has written!

    That said, not all of us can afford the cost or space for a nice ClearVue cyclone system! My use case described here is for a double garage, and I’m just a very part time woodworker. Some might say I collect tools more than I create! That said, I have had times where after milling a bunch of wood, I had sinus headaches from the dust and knew I needed a better solution than what I had.

    I started out with the basic Harbor Freight single stage unit. It’s one of the cheapest solutions but yet is one of the few Harbor Freight tools that come with good recommendations. Yes, it’s probably not the full 2HP they advertise. It kind of gets the job done out of the box, as far as sweeping up the big chips. As with shop vac solutions, most people think that’s all that is needed. I used the basic setup for a few years as I accumulated the rest of the parts to build this.

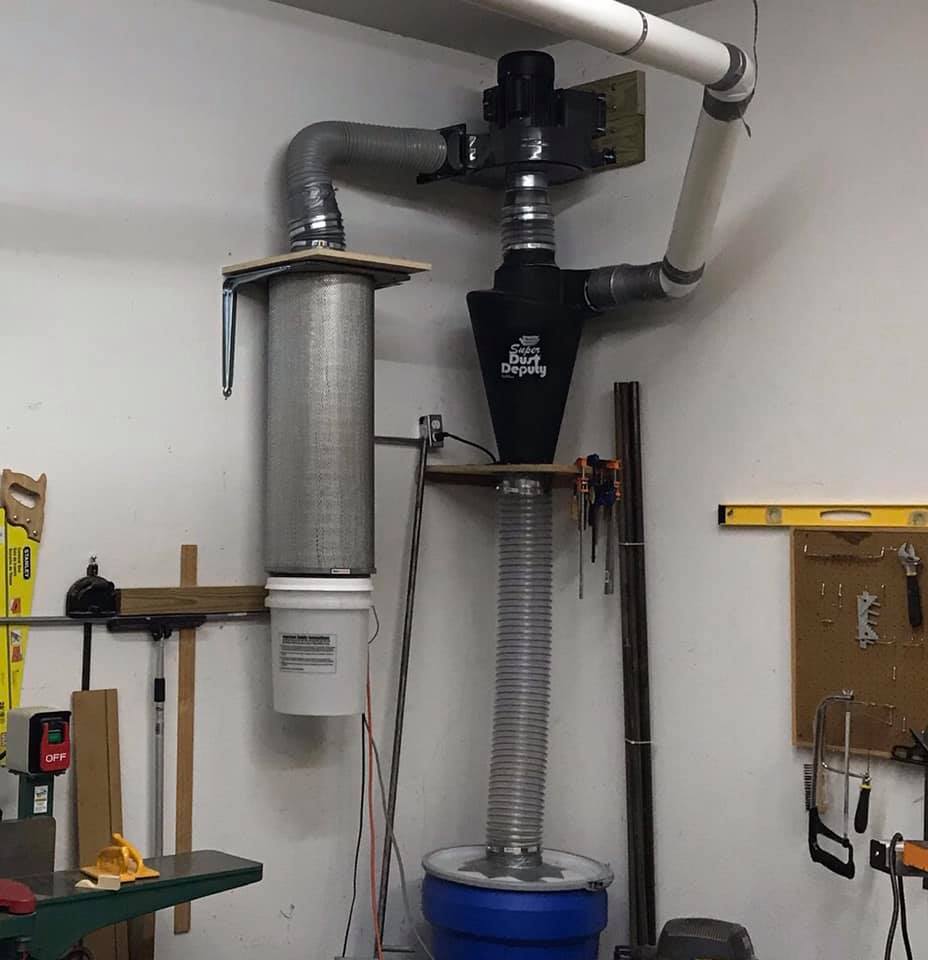
    The real problem is nearly invisible – very small dust particles that you breathe. It takes a lot of air flow and fine filters to truly keep that out of the air. So I set about adding some upgrades to the basic HF collector, and ended up with this wall mounted solution that minimizes its floor footprint and has a better chance at actually improving the air quality of my garage.

    A few notes on parts that I found important in creating this:

    Filter: The bag that comes with most single stage dust collectors is a joke. Some call it a dust pump. The bag clogs quickly, restricting air flow. I got the idea for my setup mostly from Wynn Environmental where you can get several different types of filters, to connect to the existing ring in a single stage collector, or as I have done, just a simple flange that you can attach to a board or plenum box. I opted for the flange since I intended to use a cyclone and discard the “donut” that came with the dust collector. These filters have a very large surface area and allow for a lot more airflow. Oh, and it’s a MERV 15 filter… This is hospital grade filtering!

    Cyclone: The cyclone is the Super Dust Deputy (5” Cyclone) from Oneida. This one is appropriate for 1-3HP systems. Keep in mind that cyclones add resistance to the air flow, and the HF might not have enough oomph without the increased airflow provided by the filter above. That said, I think it’s essential because it both keeps most of the dust away from the filter, and also keeps trash from hitting the impeller blades which could end up damaging them when you inevitably suck up a screw. It’s also a lot easier to empty the barrel below, instead of a dusty plastic bag.

    I tried to set up some tests before I got around to doing the final setup, and I was initially concerned that it wasn’t doing a great job, but that leads me to…

    Air leaks are BAD. The tiniest bit of air leak below the cyclone renders it inoperative. My initial bucket did not have a sealing lid, and my handmade plywood lid was insufficient. I picked up a nicer barrel that has a nice lid and locking clamp. This sealed up the bottom half of the cyclone and the result was stunning compared to what I had before.

    Gamma Seal: One more addition to the filter stack: Wynn Environmental has a page that mentioned Gamma Seal buckets, for which they make a special clamp. The bucket has a screw on lid that you can cut the center from and clamp to the bottom of the filter stack. Then you can simply twist the bucket off and onto the filter to catch any remaining dust that makes it through the system.

    In practice, the only time I have managed to find dust in the bucket is when I stuck the hose into the old barrel of sawdust, sending a ridiculous volume of dust through the system. Only a pinch of dust ended up in the bucket under the filter. Nothing at all made it into the ambient air – it smelled cleaner in the garage than before.

    UPDATE: After using it long enough to fill up the bucket, I blew compressed air back through the outside of the filter, and I did knock loose enough dust to notice… maybe 1/2 cup of volume.

    Lastly, a few words about why I arranged the ducts the way I did. The goal is to minimize the duct length of all parts of the high speed air pathways. Every inch of duct adds friction, and corners add even more. Flexible hose is the worst, so it must be kept to a minimum.

    I have seen plans where people have mounted the cyclone on top of the barrel and then extend a host from the cyclone to the fan; I think that makes for unnecessary length of the high speed flow, as well as complicating the opening of the barrel to empty the sawdust. In my design, the flexible hose is below the cyclone where there is low pressure but not high velocity air so friction isn’t a problem. In fact, friction here just slows down the sawdust which makes it fall into the barrel. The top of the cyclone is right at the edge of the fan, minimizing the distance of air flow.

    Keep ductwork bends large and sweeping, no sharp corners. I’m using 4 inch sewer drain pipe which is about the right volume for 1-2HP systems. 3HP and up would need 6 inch and a larger cyclone.

    As I write this, I have only been using my new setup for a few weeks, but I have been completely impressed by how well it is now working. I helped mill some cedar for a friend, and if you like the smell of cedar, well, it was almost disappointing because when we were done there was no cedar smell in the garage… it actually smelled cleaner than when we started! My lungs sure felt better for it though.

  • Begging the Test

    As I have become more proficient at writing tests, I have noticed one common pitfall that many developers fall into: Writing tests that repeat the logic they are testing.

    For example, this blog post wants to test a simple logic test:

    [code language=”ruby”]
    def activable?
    persisted? and (status_new? or status_suspended?)
    end
    [/code]

    The blog post then goes on to describe an elaborate way to generate a logic table that can test every combination of values for those three boolean variables. That’s great, and very clever. My problem though comes with the actual test:

    [code language=”ruby”]
    if persisted and (_new or suspended)
    license.should be_activable
    else
    license.should_not be_activable
    end
    [/code]

    What this really does is runs every combination through, and validates that the test works exactly the same way as the original code. What it fails to do is validate that every case is actually correct!

    Unfortunately, there is no substitute for taking the time to establish the data for test cases – not just the inputs, but also the expected outputs. I won’t write the code here, but I think I would create a CSV to input a truth table written out by hand, of the form:

    [code]
    persisted,new,suspended,result
    0,0,0,0
    0,0,1,0

    1,1,0,1

    [/code]

    Once the test case loads the truth table with both the inputs and expected outputs, it can truly test if the function is correct by running the code function on the inputs and comparing the result to the expected value. Now we know if the function is actually correct!

  • Web Application 101

    I often see questions on Stack Overflow that show an inherent misunderstanding of how web applications, and more specifically, ruby on rails, work. It usually involves some form of, “How do I run ruby code on a button click” or “How can I get these javascript variables to the parameters of this ruby function?”

    The problem here is one of not understanding where certain code is executed in the cycle of a web app, so let’s review. In a nutshell:

    Request Cycle Where it happens Primary language
    Form Submission or Ajax request Browser html/css/javascript
    GET/POST Network HTTP
    Controller Server ruby
    View erb/html/css (javascript set up but not executed)
    HTML Response or JSON/XML Network HTTP
    Render page or response Browser html/javascript

    Anything that needs to be run in ruby has to be done so on the server, and anything done in javascript is done on the web browser. Thus, if you need to have some data in the browser, whether in a form or in javascript, interact with ruby code, you have to begin the whole cycle from the start. Bundle the data up into a form or an ajax request and send the request to the server. Have a rails controller/view respond to it. This can be a whole page, or it can be a JSON or XML response, whatever. Then the browser handles the response by rendering a new page or dynamically handling the response.

    When you need data to cross from one environment to the other, you have to do it through a HTTP request. That is the core of web application technology!

    Of course, the tricky part comes when the view is writing javascript that is going to be run in the browser. The key to remember is execution time, and when the data is available. You can put variables into javascript code to be run if you know it ahead of time:

    [sourcecode language=”html”]
    <script type="text/javascript">
    alert("here is a ruby variable: <%= @foo %>");
    </script>
    [/sourcecode]

    However, if the data is going to be decided by the actual execution of the javascript, it is too late to access it from ruby in this request cycle; time to generate a new request cycle!

    Advanced solutions include sending along partials hidden in the page or javascript and then rendering them with javascript, such as with handlebars. That is a big enough subject for a future post.

  • SCSS and Compass put the “Zen” back into grid layouts

    When I started a particular auction application in Rails 3.0, I took the time to try out a grid layout library.  There are a number of them out there, and for unknown reasons to me now, I chose Blueprint.  It worked well, and I quickly had a usable site with much less hassle on the layout side of things.  However, the hassle proved to be greater on the print media. No surprise; printing from HTML has always been a painful ordeal.

    Recently during a site update, I realized what the biggest problem was:   I still had the same ‘span-4’  type classes in the html, but was setting a ‘display: none’ on some columns like navigation sidebars.  This resulted in a 4 column wasted whitespace that I couldn’t easily get rid of.  As a result, my printing was always off center, and restricted in space.

    [sourcecode language=”html”]
    <div class="container">
    <div id="header" class="span-24">
    This header goes across the whole screen
    </div>
    <div id="nav" class="span-4">
    Navigation stuff
    </div>
    <div id="maincontent" class="span-20 last">
    Main content
    </div>
    </div>
    [/sourcecode]

    As you can see, the layout is very straight forward, but rigid; the content section is 20 columns whether you show the nav section or not. That’s the problem with grid layouts – you end up  putting non-semantic markup in your html.   Then your design is stuck, and other media types are in pain.

    Enter rails 3.2 and the asset pipeline.  I discovered that Compass, a set of SASS mixins, also bundled Blueprint, making it a no-brainer to upgrade to SCSS and Compass.    I was able to remove the Blueprint css files from the project and replace them with few simple calls like `@import “blueprint”`. This allowed me to delete several css files from my own source code management, as they are bundled in the compass-rails gem.

    Then the real magic begins.  Instead of specifying ‘span-4’ in the nav section, I include the styles into a semantic name. The same is true for the main content areas, in an easy to read form that makes it clear what is happening:

    [sourcecode language=”css”]
    .container {
    @include container;
    #nav {
    @include column(4);
    }
    #header {
    @include column(24);
    @include last();
    }
    #maincontent {
    @include column(20);
    @include last();
    }
    }
    [/sourcecode]

    The styles that define a column are inserted directly into the nav styling.  The magic of SCSS transforms that into normal CSS for us. I won’t go into the details of SCSS features here, but you if you are familiar with CSS, you may notice this looks like CSS, but also has nesting and includes. The generated CSS has all of the formatting integrated into the semantic names. Here’s an example of what it turned into.

    The html can now be simplified down to:

    [sourcecode language=”html”]
    <div class="container">
    <div id="header">
    This header goes across the whole screen
    </div>
    <div id="nav">
    Navigation stuff
    </div>
    <div id="maincontent">
    Main content
    </div>
    </div>
    [/sourcecode]

    Why is this important?  First, the html itself is much cleaner, with meaningful names and no explicit formatting, making it much more readable. But look what happens in the print media css:

    [sourcecode language=”css”]
    header, nav {
    display: none;
    }
    .container {
    @include container;

    #maincontent {
    @include column(24);
    @include last();
    }
    }
    [/sourcecode]

    The nav and header sections are hidden, and the content section now has a full 24 columns, instead of 19!  Sweet zen! The page now uses the full size of the page, without needing any changes to the html.

    There were many other benefits to using SASS and Compass, such as variables, and mixins for advanced features such as drop shadows and rounded corners, but that was just icing on the cake.

    Having converted my layout, the print stylesheets worked much better, and I was able to get all the forms printed for this year’s event. However, web browsers still often don’t handle things consistently, and where page breaks and margins worked for me, they didn’t always work for others. So I am preparing to ditch printing from the web browser and instead, render straight to pdf for more precise printouts. I’ll save that for another post.

  • Converting a php page to Ruby on Rails

    Today I converted a partial page from PHP and Smarty into Ruby on Rails, part of a major rewrite of Maia Mailguard.
    The information for this screen come from one database table, though some elements do not map one to one to the inputs seen one the screen. Here’s the basic form, sans I18N translations:

    The original PHP page can be found on the maiamailguard.com website.

    My thoughts about that code? It violates the “Don’t Repeat Yourself” (DRY) principle. There is a lot of repetition of elements, both syntactical and semantic. For example a quick scan shows repetitions of input type=”radio” name=“*_destiny” ; just one of many. It is simply tiresome to read and understand.

    Changing gears to Ruby on Rails, my first thought was that a plugin called Formtastic has the ability to make a collection of radio buttons all from one input helper call, a clear improvement to repeating nearly the same code for each radio input. I soon had that included in the project and it works as advertised… except it put the radio in a vertical line rather than a horizontal line.

    The solution to this was to extend formtastic to add my own control. Rather than include all of the code here, I’ll just link the github changeset where you can view it. Essentially, I created a control named “radio_group”, based on the original radio_input control, but with a few changes to the html it generated. Once this was done, I was able to produce an entire row like this:

    <%= f.input :banned_files_destiny, :as=>:radio_group,
        :label => t(:text_mail_with_attachments),
        :collection=>[[ t(:text_labeled),     'label'],
                                  [ t(:text_quarantined), 'quarantine'],
                                  [ t(:text_discarded),   'discard']
                                ],
         :wrapper_html => { :class => "banned_filebody2" }
    %>

    This cut down a lot of repeated html, though one may argue that it is in fact a few lines longer that the plain html. Nevertheless I think the rails version at this point is already far more readable. However, I didn’t stop there.

    After finishing with that conversion, I noticed again that there is a lot of repetition. Four destiny lines, four bypass lines and three threshold inputs each share a lot of code. I refactored these into four helper methods, with parameters for all the essential bits of information. The end result is a stunning improvement.

    This creates a one to one mapping of each visible row to a single statement such as:

    <%= destiny_input(  f,  :banned_files_destiny,    :text_mail_with_attachments,   "banned_filebody2") %>

    Some other minor notes about the code you see: The t(:text) is a helper function built into rails to look up keys in a I18N (Internationalization) dictionary to translate the text. At the point of the screenshot above, I hadn’t entered those translations into the dictionary, so it shows placeholders. The good news is that those translations don’t impeded the code process in this page.

    Also, if you really dig deep you may discover that the policies table does not in fact have any column named *_destiny, yet the first parameter to f.input is supposed to be the name of a database column. Actually, it is the name of a method on the Policy class. The database schema used by amavisd-new has two sets of columns of interest here, *_lover and discard_*. If *_lover is true it will allow the message through regardless of of its status, and if discard_* is true, it discards it. One wonders what happens if both are set to true!

    In the previous versions of Maia, we worked around this by instead asking for a designation of “label”, “quarantine”, or “discard” – and set the real database columns accordingly. To manage this in rails was actually quite easy, easier to read than the php version. I added a set of functions to the Policy class:

    def virus_destiny=(destiny)
      self.virus_lover     = (destiny == "label"   ? "Y" : "N");
      self.discard_viruses = (destiny == "discard" ? "Y" : "N");
    end
    
    def virus_destiny
      return 'label'      if self.virus_lover
      return 'discard'    if self.discard_viruses
      return 'quarantine'
    end

    Short and sweet, it accesses and sets the two columns according to the choice made from the form. The form simply sees the virus_destiny methods and doesn’t know that it really represents two columns in the model.

    While porting a project like this is never fast and easy, the improvements made to this one little corner of Maia Mailguard make for a beautiful example of the power and readability of Ruby on Rails, and has me quite excited to continue working on “Maia on Rails”.